Today, I am going to show you Pretty Tough Pink from Finger Paints. Pretty Tough Pink is a textured metallic pink polish. Yeah...so I'm kind of over the whole texture polish thing, and I was not aware that this polish was a texture when I bough it. I bought it because I liked the color. So I blindly (read this as: without having seen it swatched) bought it because it was a pretty color. Then when I got it home and tried it on my nails poof: texture. But not to worry this one is actually more subtle in texture than the China Glaze, and the OPI textures. This one is like intro to nail texture.Texture for beginners...texture for those of us who are like "Meh, to texture polish." But enough trying to explain it. It's easier just to show you any way. So here (without any further ado) is Pretty Tough Pink:
Swatches:
Indoor no flash.
Indoor no flash.
Indoor with flash.
Closeup:
Indoor no flash.
In these pictures I used one coat of Pretty Tough Pink and no top coat. That's right one coat...And it's opaque. Well played Finger Paints well played. The polish applied easily and the texture while unexpected wasn't that big of a deal on account of it's subtle nature. The one coat was pretty awesome as well. This polish also wore really well and came off super easy (when compared to other texture polish). I was able to use regular acetone polish remover not pure acetone like I have to use to remove other textures. So final verdict: I love it, even though I'm over texture polish. This one is pretty ans subtle enough I didn't end up minding the texture. Well that's all I have for you guys today. Until next time, stay classy, and stay polished.
XOXO
Today, I have Vivid Reflection from Finger Paints Kaleidoscope collection to show you guys. Vivid Reflection is a pink, peach, orange flakie topper (clear base). This is the third polish from the Kaleidoscope collection that I have swatched and quite possibly my favorite one so far. I'm not normally a big pink kinda woman (unless you are talking about the singer, then I love P!nk), but this polish is so pretty I just love it. I can't help myself. I could blather on about this polish all day or I could just show it to you. So here it is:
Pictures:
Indoor no flash.
Indoor no flash.
Indoor with flash.
Indoor with flash.
Closeups:
Indoor no flash.
Indoor no flash.
In this picture I used two coats of Finger Paints Black Expressionism (as undies), two coats of Vivid Reflection, and a layer of top coat. This polish was a slower drying polish like the others in the set that I've swatched but it's also worth the wait. The sparkle pay off is huge on this one. I just can't stop looking at it. Let my Valkyrie sister be warned that this polish may trance you. I hope you guys like this polish as much as I do (which is a lot). Three polishes swatched from Kaleidoscope two to go. Stay tuned. Until next time, stay classy and stay polished.
XOXO
Today, I have Psychedelic Hue from Finger Paints Kaleidoscope collection to show you guys. Psychedelic Hue is a teal to green flakie topper in a clear base. For this picture I used China Glaze Liquid Leather as a undies. This is swatch number two from the Kaleidoscope collection. Here is Psychedelic Hue:
Pictures:
Indoor no flash.
Indoor no flash.
Indoor with flash.
Closeups:
Indoor no flash.
Indoor no flash.
In these pictures I used two coats of China Glaze Liquid Leather, two coats of Psychedelic Hue, and a later of top coat. This polish is a tad slow to dry, faster that the older flakies by Finger Paints but still on the slow side. That said this polish is so worth to time it takes to dry. I freaking love it. Such a pretty polish. I'll be posting the rest of the collection soon so stay tuned. Until next time, stay classy, and stay polished.
XOXO
First of all I want to apologize for the lack of posting...but it's been a week. I ended up going to the doctor twice this week on account of getting hurt at work. One Baro trauma to the left ear, one tetanus shot, one laceration, and a dislocated finger later I'm attempting to type this for you with a splint on my finger. Anyway, today I have Abstract Abstraction from Finger Paints to show you guys. Abstract Abstraction is one of Finger Paints new flakie polishes. It's a blue, green, and purple flake polish. I used China Glaze Liquid Leather as Undies on this one.
Pictures:
Indoor no flash.
Indoor with flash.
*Flash kills the color for some reason...
Closeup:
On this manicure I used two coats of Liquid Leather and two coats of Abstract Abstraction with a heavy coat of topcoat over everything. This polish applies easily and is a slower drying polish. That said I really think it dries faster than the previous flakies released by Finger Paints. They wore really well (I wash my hands a lot because I work with kids) and It barely even chipped. I took if off because I just wanted a different color not because it was chipped as I usually do. Anyway, I hope you guys enjoy this swatch, and I will be posting swatched or the polishes from the rest of this set soon, so stay tuned. That's all I have for you today. Until next time, stay classy, and stay polished.
XOXO
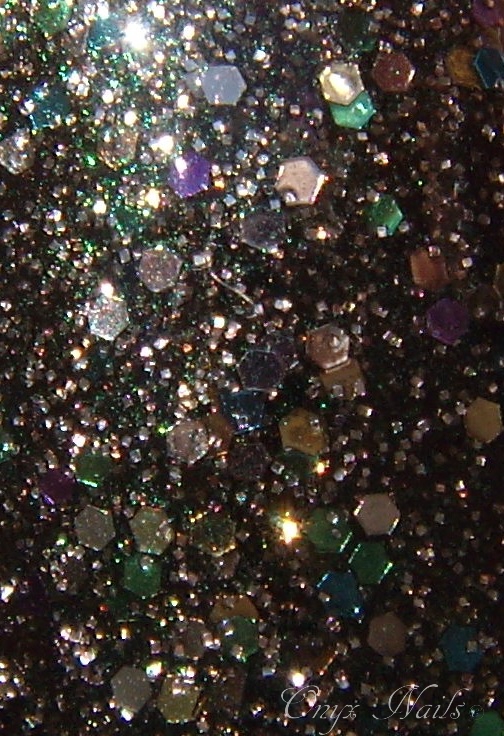
Today, I have a Finger Paints Hue Brighten My Day swatch to show you guys. Hue Brighten My Day is a dark hunter green polish with gold, silver, and holographic glitter in a variety of hexagons and square shapes. Free warning this polish may trigger a full of Valkyrie trance.
Pictures:
Indoor no flash.
Indoor with flash.
Outdoor in sunlight.
Outdoor in shade.
Closeups:
Outdoor in sunlight.
Indoor no flash.
I used 3 coats of Hue Brighten My Day and a layer of top coat. The polish is sheer but it dries quickly and applies easily. Over all, I really like this polish. It's dark and sparkly, and I love it with all my dark, sparkly, Valkyrie heart. Definitely a must have fall glitter, for anyone who likes dark polish, sparkly polish, or fall color nail polish. So what do you guys think? Are you loving Hue Brighten My Day as much as I am? Well, that's all I have for you guys today. Until next time, stay classy and stay polished.
XOXO
Today, I have some nail art based on Kick-Ass 2. I absolutely love Kick-Ass1 and I'm going to the squeal tonight. So, I thought how about some nail art. If you haven't seen Kick-Ass you so should. It's awesome. Hit-Girl is a freaking awesome little bad ass super hero. Anyway here's my nail art.
And a song from the Kick-Ass 1 (in a Hit Girl kicking ass sequence) that I just love and that every woman should have on their iPod.
Bad Reputation by Joan Jett
I used several different forms of nail art on this manicure. I used taping, stamping, self made decals, and free hand nail art. This one took forever but had a pretty good payoff I think. I didn't attempt faces because all my faces look just awful. That aside I think it turned out pretty well. Are you guys going to see Kick-Ass 2? Or have you already? As excited as I was for this movie to come out I waited for Tuesdays because my local theater does cheap popcorn on Tuesdays. I can't wait I'm so excited. Anyway, I hope you guys enjoy this manicure. Until next time, stay classy and stay polished.
XOXO
Today, I have a Jelly Sandwich to show you guys. I bought China Glaze Isle See You Later even thought I had heard (from multiple bloggers) that it was really low in opacity and boy they weren't kidding. This may be the least opaque nail polish I own. It's on par with french manicure jellies. Luckily, I didn't buy it to wear alone, I wanted it for Jelly Sandwiches. But I quickly realized that even for use in a Jelly Sandwich it was going to need some underwear. But enough blathering, here are the pictures of my blue Jelly Sandwich manicure.
Pictures:
Indoor no flash.
Indoor with flash.
Outdoor in sunlight.
Outdoor in shade.
Closeup:
Indoor no flash.
What I Used:
China Glaze - Sunday Funday
China Glaze - Isle See You Later
Finger Paints - Colorful Collage
I used two coats of Sunday Funday as under wear, one coat of Colorful Collage, and three coats of Isle See You Later. Over all I like how it turned out but I wish Isle See You Later had a bit more pigment in it. It's kind of meh. I'll experiment with it a little more but as of now I can't really see myself using it for anything else but French Manicures and Jelly Sandwiches. Because it really doesn't give you much to work with, pigment wise. That's all I have for you guys today until next time, stay classy, and stay polished.
XOXO
I realized that I haven't done any nail art and more specifically any tutorials for quite some time so I thought I would do one today. Also I just wanted to mention that there is actually a really good reason I don't do a ton of nail art or tutorials, and it's because I have both carpel tunnel and a bulged disk in my neck (at C5). And for whatever reason they are both more troublesome in the winter. So I do a lot of swatches (between tutorials and nail art) because those posts can usually be done even if either (or both) are giving me trouble. I just wanted you guys to know so you don't feel cheated when I post a lot of swatches and not a lot of nail art. IMO all nail posts have value but a recent event brought to my attention that others don't seem to think so. If you only want to see nail art I will post that, but not as often during the winter as I do during the warmer months.
Okay, now that's out of the way...Today, I am going to show you guys my version/interpretation of the mermaid manicure. And added bonus I am going to show you how to get the look yourself.
Finished product:
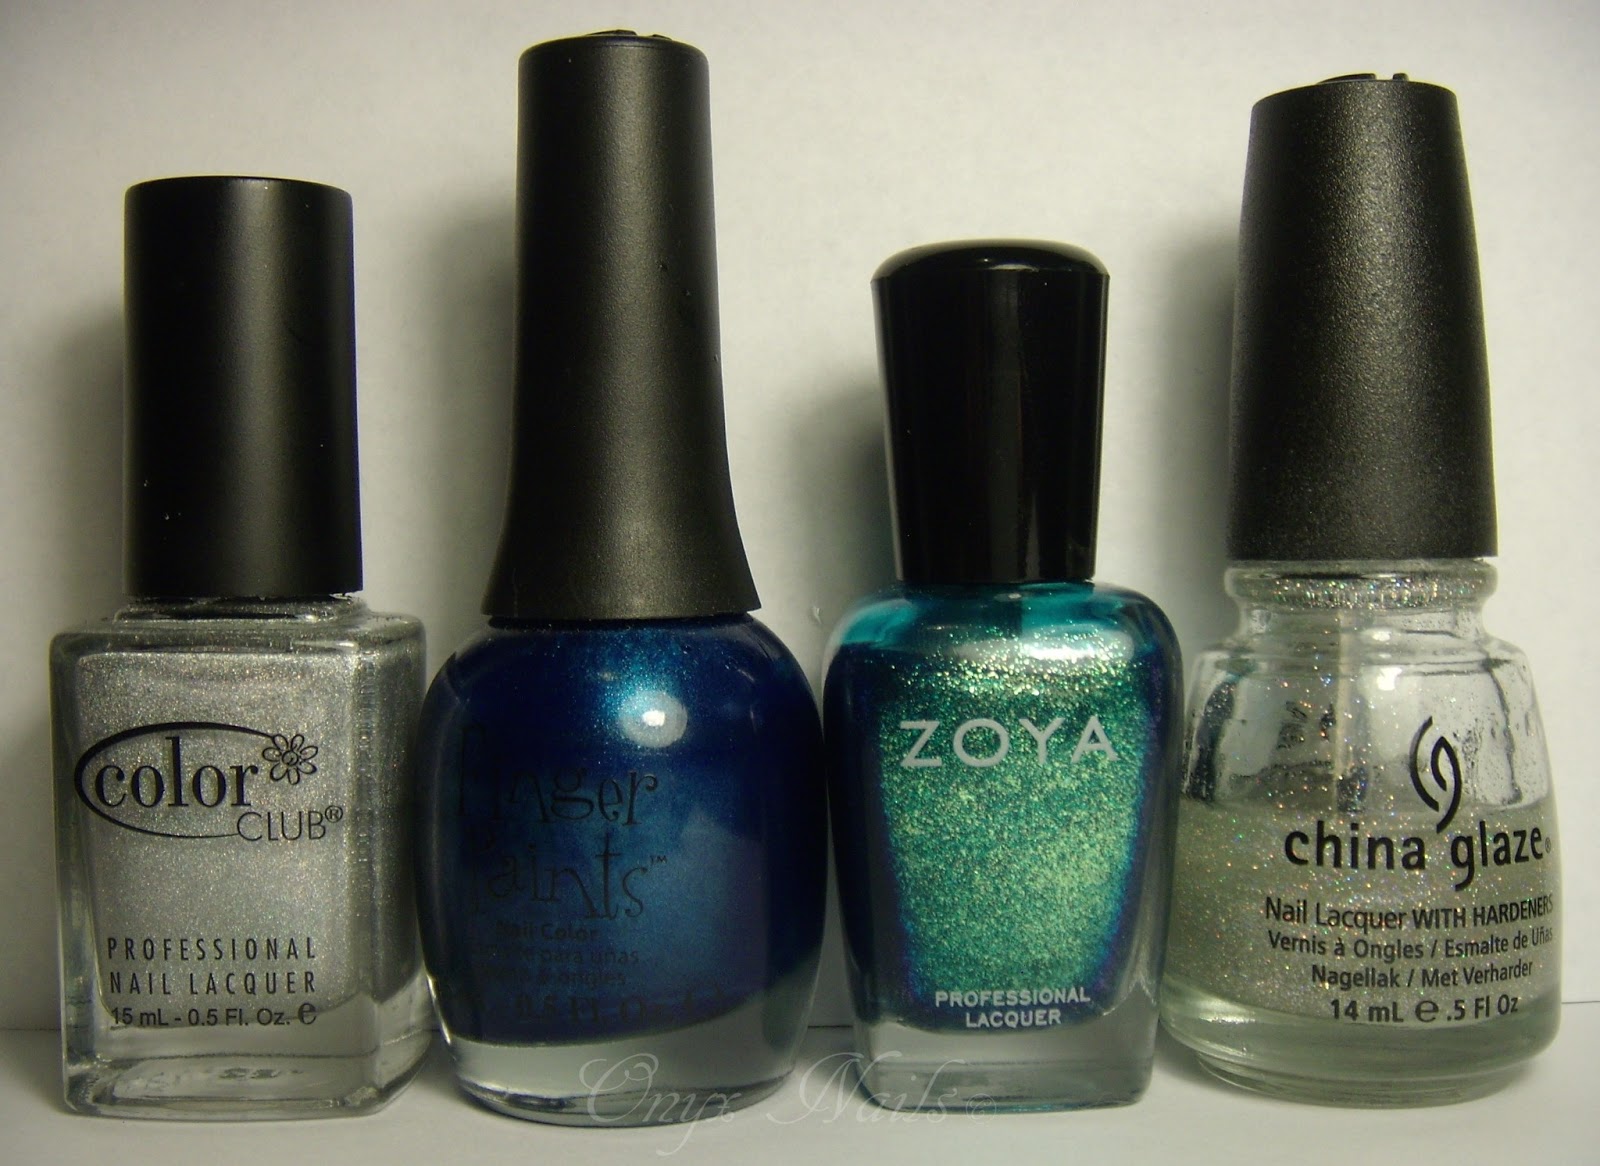
What You Will Need:
Top coat (Seche Vite) and a makeup sponge.
Color Club - Worth The Risque
Finger Paints - Artistic Azure
Zoya - Charla
China Glaze - Fairy Dust
Konad nail stamper and scraper. Shany plate number SH222.
And cotton buds for clean up.
Step one:
Start with fully polished nails. 2 coats of Zoya - Charla.
Step two:
Apply Finger Paints - Artistic Azure on edge of makeup sponge.
Step three:
Sponge Finger Paints - Artistic Azure liberally on the nail tip only. You may have to do a couple coats.
Then allow to dry.
Step four:
Clean up any polish you got on your skin.
Remember Finger Paints are slow dry polishes, so you will need lots of dry time.
Step five:
Apply a layer of Fairy Dust.
Let dry.
Step six:
Prepare stamping plate. Apply Color Club - Worth The Risque, scrape off excess, use stamper, then check the stamp to make sure it copied properly.
Step seven:
Stamp design on all nails.
Step eight:
Clean up cuticles again.
Step nine:
Apply top coat and allow to dry.
Finished product. Outdoor picture.
Mermaid by Train...cuz I thought it was relevant. Plus it was the only song I could think of that was mermaid related. Even though I'm not a big Train fan. I'm a nerd like that.
Well there you have it, my interpretation of the mermaid manicure. I hope you guys enjoyed this manicure and this tutorial. I also hope that you feel like you can now try it yourself because let's face it that's what this is all about right. I also want to thank my followers for understanding that I will do nail art as often as I can, and I really appreciate your support. Until next time Stay classy and stay polished.