So after I swatched OPI's A Rose From The Dead (ARFTD) I thought that it looked familiar. So I went to my collection and sure enough the bottle looked remarkably like China Glaze Rich and Famous (R&F). So I figured I would do a comparison and see if they were dupes.
The bottles.
Indoor with flash.
Indoor no flash.
Outdoor in sunlight.
Outdoor in the shade.
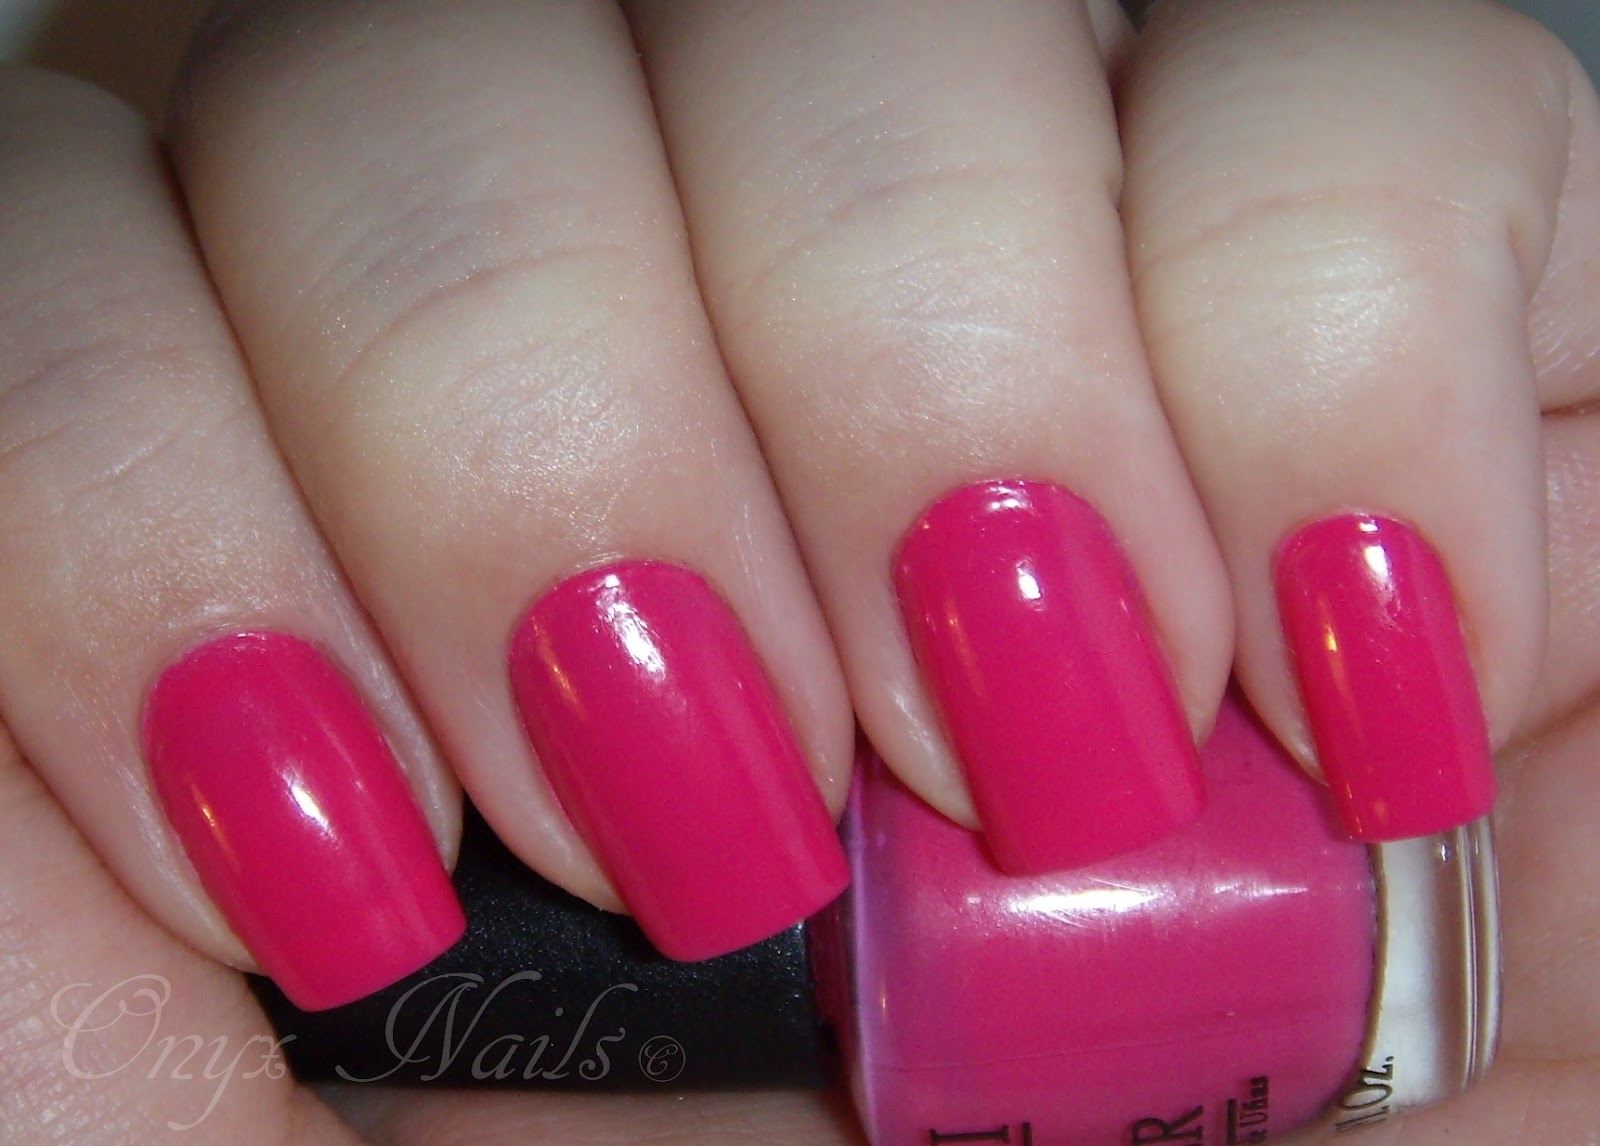
The swatches.
Indoor with flash.
Indoor without flash.
Outdoor in shade.
Outdoor in sunlight.
So as you can see they are really close in color...similar but not the same. R&F is more bubble gum pink and ARFTD is more of a rose pink. They actually show more contrast on camera than they do in person...which is kind of weird. The best color representation is in the Outdoor in sunlight picture. The verdict...they are not exact dupes...but if you really like the color you might be happy with R&F as a substitute since you can't buy ARFTD in any size but mini. After all if you didn't see them next to each other (or like my husband) just see them both as pink (end of story), then you could do worse than to pick up R&F which is part of the China Glaze core line. What do you guys think? Is it close enough or not? Anyway that's all I have for you today. Until next time stay classy and stay polished.
XOXO
Today I have a swatch from OPI's So-So Skullicious mini set A Rose From The Dead (ARFTD). ARFTD is a bright (almost neon) medium pink creme. Actually it reminds me of Barbie shoes...like these ones over here. A bright pink girly, girl pink.
The bottle.
Indoor with flash.
Indoor no flash.
Outdoor sunlight.
Outdoor shade.
Swatches.
Indoor no flash.
The bottle is so tiny in my hand I feel like a giant. lol
Indoor with flash.
Outdoor shade.
Outdoor sunlight.
In the pictures above I used two coats of ARFTD and one coat of top coat. The formula applies easily and to full opacity in two coats. The best color representation in in the Outdoor sunlight picture. It's a really fun shade that screams summer to me...which makes me wonder why they released it as a fall/Halloween/Day of The Dead/Seasonal polish...And why they only released in in mini form. After wearing it I want a full size bottle. I wasn't sure about this polish in the bottle but on the nail it's just lovely. I highly recommend it. Well that's all I have for you today. So until next time, stay classy and stay polished.
XOXO
Today I have a swatch for you from China Glaze's Halloween collection (Wicked) named Immortal. Immortal is a pale grey polish with small, silver, blue and pinkish/purple micro-glitter it it.
The bottle.
Indoor with flash.
Indoor without flash.
Outdoor...yeah weather didn't cooperate again...
Close up (on nail).
Indoor without flash. Note small blue and pink/purple glitter.
Swatches
Indoor with flash.
Indoor without flash.
Outdoor.
This polish is a nice thick formula that applies easily and dries quickly. I used two coats of Immortal and a top coat in the pictures above. This polish is simply amazing on the nail. The pictures just don't do it justice. I will be wearing this one a lot this fall. It's funny that a polish can remind you of a movie and in turn a song but that's exactly what this polish has managed to do. It actually reminds me of Selene's coat in Underworld Awakening (the one she steals after escaping from the cryo facility) and that reminds me of the song in the credits called Made of Stone by Evanescence. Haven't heard it? Here it is.
Also don't forget to vote for me over at Manicured Monkey's Halloween nail art contest over here, I'm number 24. You can vote everyday and it would be greatly appreciated.Well that's all I have for you today. Until next time. Stay classy and Stay polished.
XOXO
Today I have a swatch and review of Fantasy Makers by Wet n'Wild Once Upon A Time (OUAT). The Fantasy Makers line is a seasonal sub-brand of Wet n'wild and the colors tend to fluctuate from year to year. I've never really bought a Fantasy Maker polish before but when I saw this color I knew I had to make an concession. When I show you the swatches you understand why. The main reason OUAT caught my attention is that it looks like a dupe for Deborah Lippmann Ruby Red Slippers (RRS). Now I don't have Ruby Red Slippers to be sure but it looks pretty darn close to me (See RRS here and judge for yourself). OUAT is a black jelly polish with bright red (large and small) hexagonal glitter in it.
The bottle.
Indoor
Outdoor.
Close up.
Swatches.
Indoor with flash.
Indoor without flash.
Outdoor in shade.
Outdoor in sunlight.
Like all chunky glitters application can be tricky as the glitter likes to clump up together, and you want to make sure that the glitter doesn't hang off your nail (those little suckers are sharp), but over all this polish is not hard to apply at all. In the pictures above I used 3 coats of OUAT and a heavy layer of top coat. This formal also dries really quickly so you don't have to worry about needing three layers. Plus at $1.99 a bottle it's quite the steal. My inner Valkyrie is drooling and staring at the bottle mesmerized as we speak. Dark, sparkly...oh yeah I'm in love. Well that's all I have for you today. So until next time, stay classy and stay polished.
XOXO
Yay, I have internet again! And here is the proper post I promised you of my Slasher Movie Bad Guy mani. The Halloween contest is open through October 21st so please go over Here, follow the blog and vote for my entry. I'm number 24. You can vote once a day. And since I could only upload one picture for the contest here are some more shots showing you this mani in all it's glory. Also now you know what the left hand that went with my right hand splatter mani looks like.
Indoor with flash.
From left to right: Freddy Kruger (Nightmare On Elm Street), Leather Face (Texas Chainsaw Massacre), Ghost Face (Scream), Jason Voorhees (Friday the 13th), and Mike Myers (Halloween).
Indoor without flash.
Outdoor in shade.
Outdoor in sunlight.
Over all look.
Polish List.
ORLY - Grave Mistake
China Glaze - Salsa
China Glaze - Liquid Leather
China Glaze - Near Dark
China Glaze - Street Chic
China Glaze - White on White
China Glaze - City Siren
OPI - Skull & Glossbones
Nails Star - Black
So that's my contest entry it took forever and the pinkie nail being the most difficult...it's one of those times I wish I had bigger nails. So if you would go over to The Manicured Monkey's website and vote for number 24. One more time here's the address Vote For Number 24. That's all I have for you today. Until next time stay classy and stay polished.
XOXO
So my internet is down (4th time in as many months) so instead of waiting until Friday for CenturyLink to fix it, I am waiting until Tuesday for my new installation from CableOne. And so have no internet until then (sad panda). I'm only able to make this post because Droid rules. I'll do a proper post on Tuesday when I will have a more reliable internet connection. Anyway this post is going to be short and sweet because typing this on my phone is less fun than it sounds. I just wanted to do a quick post and let everyone know that my entry over at Manicure Monkey for Halloween Nail art is up and running, ready to be voted on. I'm number 24. You can vote for me once a day. Please take a few minutes and vote for me. Thank you in advance.
And here's the link. The Manicured Monkey: Halloween Nail Art Contest!
Until next time stay classy, and stay polished.
XOXO
Hi guys! I'm back after my Birthday hiatus. I got some new nail polish for my birthday. Big surprise right? Yeah, probably not so much. It is me and I am just slightly (only in the tiniest sense) obsessed with nail polish after all. Want to see what I got? I thought that you might.
Deborah Lippmann Across The Universe.
This is the first DL I ever lusted after and now it's in my collection thanks to my dear friend Marcie. TY!
Wet n'Wild Once Upon A Time & Go With The Glow
I was in Fred Meyers on my birthday and noticed that Wet n'Wild polish was BOGO 50% off. I'm thinking that Once Upon A Time might be a possible DL Ruby Red Slippers dupe ( X Fingers crossed X ). Total $3.
And lastly I stopped into Trade Secret looking for the So-So Skullicious mini set, and they had their entire polish stock BOGO 75% off...so I picked up China Glaze Immortal as well (for only $1.75). I was over the moon to see that they had the new CG Halloween set Wicked in. Squee!!!!
Over all 8 new additions to my polish (but 4 are mini's), so not to shabby. I'll swatch them for you as I wear them. Maybe this glow in the dark polish will actually show up on camera. A girl can hope since my China Glaze Ghoulish Glow doesn't show up (Grrrr!). Any way, that's all I have for you guys today. Until next time, stay classy and stay polished.
After I took off ORLY So Go-Diva as my nails were a little yellowy and sad looking. So I decided to try out something I saw on Pinterest to whiten nails. I had never tried this recipe before but I've never really needed to my nails don't yellow that much but I figured I may as well put it to the test for my blog and see what happens.
Here's the recipe I used:
1/2 hot water
4T Baking Soda
3T Peroxide
Mix until baking soda is mostly dissolved. And soak you're nails for 1-2 minutes. (I soaked for 2)
You get a mixture that looks like this.
Nothing to write home about.
Here are my nails before.
And here are my nails after.
So as you can see there was not much of a difference...maybe if you squint really hard you could say that they are maybe 1shade lighter than they were before. I would consider this a fail...at least it was for me. But to be fair my nails were not all that yellow to begin with. Even though I have had my nails painted everyday for the last 22 months, and use a lot of dark colors and reds my nails just don't stain that much. Maybe I'm just one of the lucky ones or maybe my favorite base coat Bonder is just freaking awesome. Has anyone else tried it? I want someone else to try it to see if it'a just me. Well that's all I have for you today, so until next time, stay classy and stay polished.
XOXO
So I came up with this idea to do a latticed manicure with my duochrome polishes and after a swatch-fest and the help of my dear friend (and minion) Marcie (look over there ----> it's her fault if you don't like the colors.) I/we decided on the colors I would use for this manicure and since I haven't done a tutorial for ages I figured I would make this one a tutorial. First of all when I started this manicure I had no idea what I was going to call it but after discussing it with Marcie she said it reminded her of Rapunzel. I was like what???
But as it turns out she meant this...
And I was thinking this....
Yeah...I think I've seen the Shrek movies to many times.
Her idea made more sense after I realized we were thinking of two different versions of the same character and I thought "you know...why not?" I have a name for my manicure and after thinking about it I kind of get the connection. But enough of my blathering lets get to the tutorial.
Here's what you will need
A top coat (ORLY Won't Chip), a base coat (ORLY Bonder), OPI Just Spotted the Lizard, and China Glaze No Plain Jane.
You will need striping tape and tweezers.
You will also need some q-tips for clean up.
Start with clean dry nails, that are filed and cuticles pushed back. I still feel I should blur my nail nudity. LOL
Now apply a base coat.
Apply your base colors and let fully dry. I used 2 coats of each OPI Just Spotted The Lizard, and China Glaze No Plain Jane.
I reversed the colors on my ring finger for an accent nail.
Cut striping tape into inch (varies depending on your nail length and width) pieces and apply to nail.
Make sure you really press down on the tape. If it doesn't stick well to your nail then there will be no design after you remove it.
Apply 2 coats of polish over the striping tape. Allow about a minute to dry before moving to next step.
Remove striping tape. Use tweezers so you don't end up with polish where you don't want it.
And have something around to stick the striping tape to when you are done. I used an index card that happened to be lurking around my desk.
Clean up your cuticles.
Apply a top coat.
Swatches.
Indoor with flash.
Indoor without flash.
Outdoor in sunlight.
Outdoor in the shade.
So there you have it the Rapunzel nail manicure. I hope you found this tutorial easy and helpful, and most importantly like you could do this yourself. I was thinking about posting some tunes with this post (i.e. a play list) becuase this manicure will take you a while. But to be honest I was just listening to the new Matchbox Twenty CD. If you haven't heard it you should it's freaking awesome and if you could't tell I'm kind of obsessed with it at the moment. Oh crap...I can't resist here is Parade.
Thank for indulging my obsession of the moment. I also want to mention that I will most likely be MIA through the end of the week since my birthday is Wednesday (and no I won't tell you how old I am, so don't ask. A lady never tells and if you know and you tell, I will kick you in the shin for doing so). So, I will have several posts in the early part of the week but the second half I'll be doing birthday related things/shenanigans. Anyway that's all I have for you today, until next time stay classy and stay polished.


.jpg)


