Showing posts with label Tutorial. Show all posts

Wednesday, April 10, 2013

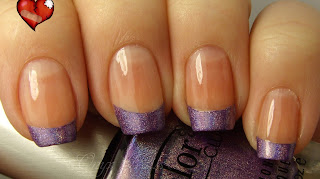
Easy French Manicure Tutorial (3 Different Ways)

     When I posted my swatch of New Flesh on my instagram I had a few people ask how to do a french manicure (on account of it's pale peachy nature). So I decided that I would do a tutorial of three of the four ways I know of to try. why not all four you ask. Because the fourth way involves rubber bands and I am allergic to latex...so yeah...only three ways. Also this is going to be a picture heavy post and I even made a crappy tiny video for part of it (my first video filmed with my Droid and edited on my laptop)...Be gentle I've never shot/edited/posted a video before...but feel free to laugh at my crappy cameramanship...(is that a word? Probably not but I'm using it anyway). But with no further ado...here's three different ways to get the french manicure look.

Supplies:
Top coat and base coat. Dealers choice these are my favorite though.

Hole reinforcement stickers (bought at an office supply store so long ago I don't even remember where) and tape (I used painters tape because it's what I had but use whatever tape you have on hand/prefer). 

Before whichever method you choose to try make sure do this:
Start with a clean dry nail. 

Apply a base coat. Okay now you can proceed. 

Method Number 1:

The Tape Method:

What you'll need: 
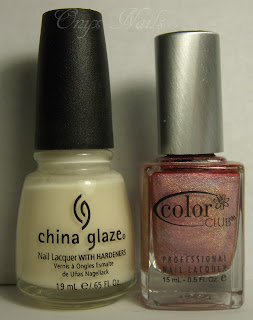
A jelly base coat to give a nice sheen to the nail, (I used China Glaze - Love Letters) and a tip color (I used Color Club - Beyond).

Apply one thin coat of your jelly polish to the nail and let dry. 
*Wounded heart still covering gross cut. 

Apply tape to nail making sure that the line of the tap is below your natural nail line so the white doesn't peep through and give you away. I did each nail at a different depths of tape to show you some possibilities...if you were doing this on your own you would want to keep them as similar as possible for continuity. I just wanted to give you options and you could even go deeper if that's the look you like. I prefer a more natural look...but hey different strokes and all that. 

Next apply the tip color of your choice. 

Before the polish dries remove the tape pulling from left to right carefully so as not to smudge the polish. 

Clean up your cuticles and apply topcoat. 

Then guess what...you are done.

Method Number 2:

The Sticker Method:

A jelly base ( I used China Glaze - Ooh La La Peach) and a tip color (Color Club - Eternal Beauty).

Apply jelly base color.

Imagine that your hole reinforcement stickers have a little clock on them (like I drew on the one above. Now take your stickers and make a cut at 8 and four for large nails and 7 and 5 for small nails. 

Once you've made your cuts it should look like the letter "C."

Apply the stickers to your nails as pictures. Again places them as low or as high as you want to give you different tip widths. but always go below the white of your natural nail. 

Apply the tip color. 

Remove the stickers before polish is dry then clean up the cuticles. 

Apply a top coat when all polish is completely dry. 

There you have it a more bowed French manicure. This style looks more like traditional nail tips that you would have put on in a salon. 


Method Number 3:

Freehand: 

Jelly base color ( China Glaze - Striptease) and tip color (Color Club - Halo-Graphic)

Apply your jelly base color. 

So I don't have a tripod to hold my phone while I recorder this so I was only able to record a video showing how to roll your finger to apply the polish. Rest the hand with the brush on a flat surface and move only the nail to be painted as shown above in one smooth rocking motion from one side to the other. Right to left or left to right. The most important part of this is to move the finger to me painted not the brush. If you move the brush you could end up getting a wiggly line instead of the clean one we are after. 

Clean up you're cuticles.

Apply a topcoat. 

And there you have it a free hand French manicure. This one may be a bit harder/trickier to master than the other forms. But don't give up you'll get it. 

   So there you have it three different ways to achieve the French Manicure look all by yourself. I know I didn't use New Flesh, but there's a good reason for that. When I do a tutorial I like to use commonly available (read this as easily obtainable) polishes that are on the inexpensive side... because what good is a tutorial if you can't find/afford the product(s) used (am I right?). New Flesh being limited release Deborah Lippmann it didn't fit either of my tutorial requirements...but if you have it already then use it. I'm sure it would be lovely here. I also used several different sheer jelly polishes so you can get an idea of what different shades would look like...to be honest most jellies just add extra shine and a tiny (read this as so little color your husband won't notice any color at all) hint of color so use whichever sheer jelly you like/have. I really hope you guys enjoyed this tutorial and that you feel like you can attempt one (or all) of these methods to get the French Manicure look. Let me know if you try it and/or if you have any tutorial request for future posts with a comment below. That's all I have for you today. Until next time, stay classy, and stay polished.
XOXO

Thursday, January 10, 2013

Mermaid Nails Tutorial

     I realized that I haven't done any nail art and more specifically any tutorials for quite some time so I thought I would do one today. Also I just wanted to mention that there is actually a really good reason I don't do a ton of nail art or tutorials, and it's because I have both carpel tunnel and a bulged disk in my neck (at C5). And for whatever reason they are both more troublesome in the winter. So I do a lot of swatches (between tutorials and nail art) because those posts can usually be done even if either (or both) are giving me trouble. I just wanted you guys to know so you don't feel cheated when I post a lot of swatches and not a lot of nail art. IMO all nail posts have value but a recent event brought to my attention that others don't seem to think so. If you only want to see nail art I will post that, but not as often during the winter as I do during the warmer months.

    Okay, now that's out of the way...Today, I am going to show you guys my version/interpretation of the mermaid manicure. And added bonus I am going to show you how to get the look yourself.

Finished product:

What You Will Need:

Top coat (Seche Vite) and a makeup sponge. 

Color Club - Worth The Risque
Finger Paints - Artistic Azure
Zoya - Charla
China Glaze - Fairy Dust

Konad nail stamper and scraper. Shany plate number SH222.

And cotton buds for clean up. 

Step one:
Start with fully polished nails. 2 coats of Zoya - Charla. 

Step two:
Apply Finger Paints - Artistic Azure on edge of makeup sponge. 

Step three:
Sponge Finger Paints - Artistic Azure liberally on the nail tip only. You may have to do a couple coats. 
Then  allow to dry. 

Step four:
Clean up any polish you got on your skin. 
Remember Finger Paints are slow dry polishes, so you will need lots of dry time.  

Step five:

Apply a layer of Fairy Dust
Let dry.

Step six:
Prepare stamping plate. Apply Color Club - Worth The Risque, scrape off excess, use stamper, then check the stamp to make sure it copied properly. 

Step seven:
Stamp design on all nails. 

Step eight:
Clean up cuticles again.

Step nine:
Apply top coat and allow to dry. 

Finished product. Outdoor picture. 

Mermaid by Train...cuz I thought it was relevant. Plus it was the only song I could think of that was mermaid related. Even though I'm not a big Train fan. I'm a nerd like that.

     Well there you have it, my interpretation of the mermaid manicure. I hope you guys enjoyed this manicure and this tutorial. I also hope that you feel like you can now try it yourself because let's face it that's what this is all about right. I also want to thank my followers for understanding that I will do nail art as often as I can, and I really appreciate your support. Until next time Stay classy and stay polished. 
XOXO

Friday, October 12, 2012

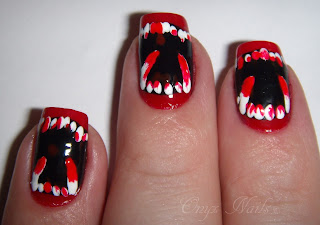
Halloween Vampire Fang Tutorial

     Hi guys! Today I have another Halloween manicure for you. And added bonus it's a tutorial so you can do it yourself if you feel so inclined. This is actually a rarity for me though. Not the tutorial part but the fact that I have never done this manicure before and I made my first attempt a tutorial. This could have gone catastrophically wrong (But it didn't so yay!). I'm not completely pleased with how it turned out (I am a perfectionist, the fangs are never right! Gah!) but I like it just the same, specially for a first attempt. I'm going to set this tutorial up a little differently than I usually so as well. I am going to show you the photos of the finished product then show you how to do it. I'm feeling all experimental today so let me know which way you would prefer to see the tutorial (Finished product then how to or how to then finished product) in a comment and I'll do it that way in the future. Also free warning this is a picture heavy post. Okay, I've blathered enough here we go.

Finished product.
Indoor with flash.

Indoor no flash.

Outdoor in shade.

Outdoor in sunlight. 

Supplies!!!!!

Here's what you will need:

A base coat (Orly Bonder) and top coat (Seche Vite aka the best top coat ever). 

A red polish (China Glaze Salsa) and a black polish (China Glaze Liquid Leather).

White Acrylic Paint (Americana White Wash) and a red striper pen (Nail Art Red).

A black fine point Sharpie pen. 

A fine point paintbrush (10/0 Loew-Cornell 5803 Spotter). I got this one at Micheal's for a dollar or so. 

Some whole reinforcement stickers. 

The Tutorial!!!!

Step 1:
Start with clean, dry nails that have been filed with  your cuticles pushed back.

Step 2:
Apply a base coat.

Step 3:
Apply 2 coats of red polish. Let fully dry.

Step 4:
Stick hole reinforcing sticker on nail so that you get a small rounded crescent section by the cuticle showing. This will be the top lip. 

Step 5:
Use your Sharpie pen to trace around the edge of the sticker. Don't worry if you get any ink on your skin, nail polish remover will take it right off. 

It should look like this when you remove the sticker. This will provide a guide for later. 

Step 6:
Again place a sticker on your nail this time to make the bottom lip.  Make a crescent shape this time on the tip of your nail. Trace with black Sharpie. 

Step 7: 
Remove the sticker and there you have the outline for the lips and mouth.

Step 8: 
Fill in the lines you just drew with a black polish. Don't worry it doesn't have to be perfect. The world is full of crooked mouths, plus you will barely see the lines after we apply the teeth. Sorry the picture is over exposed my camera was not wanting to take this picture I took 25 shots and this was the best one. 

Step 9: 
Use your paint brush and acrylic paint to create teeth. I just shake up the paint and use the paint out of the lid makes a smaller clean up when you are done. 

For best results use more pressure at the base of the teeth and less pressure at the tip (or point) of the teeth. Feel free to make the fangs as long (or as short) as you want...if you are so inclined you could even make all the teeth pointy or have two sets of fangs (Like in the TV show Blood Ties)..really dealer choice here. I happen to like vamps with two fangs, the rest of their teeth being normal so that's what I did. But if you like 50 Days of Night Vampires (i.e. a mouth full of jacked up razor sharp teeth) do that. In fact if you do that message/email me a picture, I'd like to see it. You can also stop here if you are happy with just the fangs. I however will continue because a vampire mouth is not a vampire mouth with out a little blood. After all vampires are such messy eaters. Also make sure it has plenty of time to dry. 

Step 10:
Use your nail striper pen to add a little carnage to this vampire mouth. Also FYI, I got this stiper at the dollar store, so don't worry about the prices in beauty supply stores. Stipers don't have to cost you and arm and a leg. 

Apply as much or as little blood as you want. Let dry. Give it 15 minutes. Stiper products have notoriously slow dry times.

Step 11: 
Apply a top coat, and you're done.

And because I can't help it I have to attach a song. If I Was Your Vampire by Marilyn Manson. If you don't like him (him? them? hmm..not sure on the personal pronoun here, but you get the idea) don't listen to it (I happen to adore him the person and them the band. Dang you personal pronouns!) but I think it fits this mani so I am posting it. 


     Well there you have it my Vampire Fang Tutorial. I hope you enjoyed it. And more importantly feel like you can try it. Let me know if you do. Specially if you do that 50 Days Of Night idea..that sounds pretty cool I may do it myself. Any way that's all I have for you guys today. Until next time, stay classy and stay polished. 
XOXO