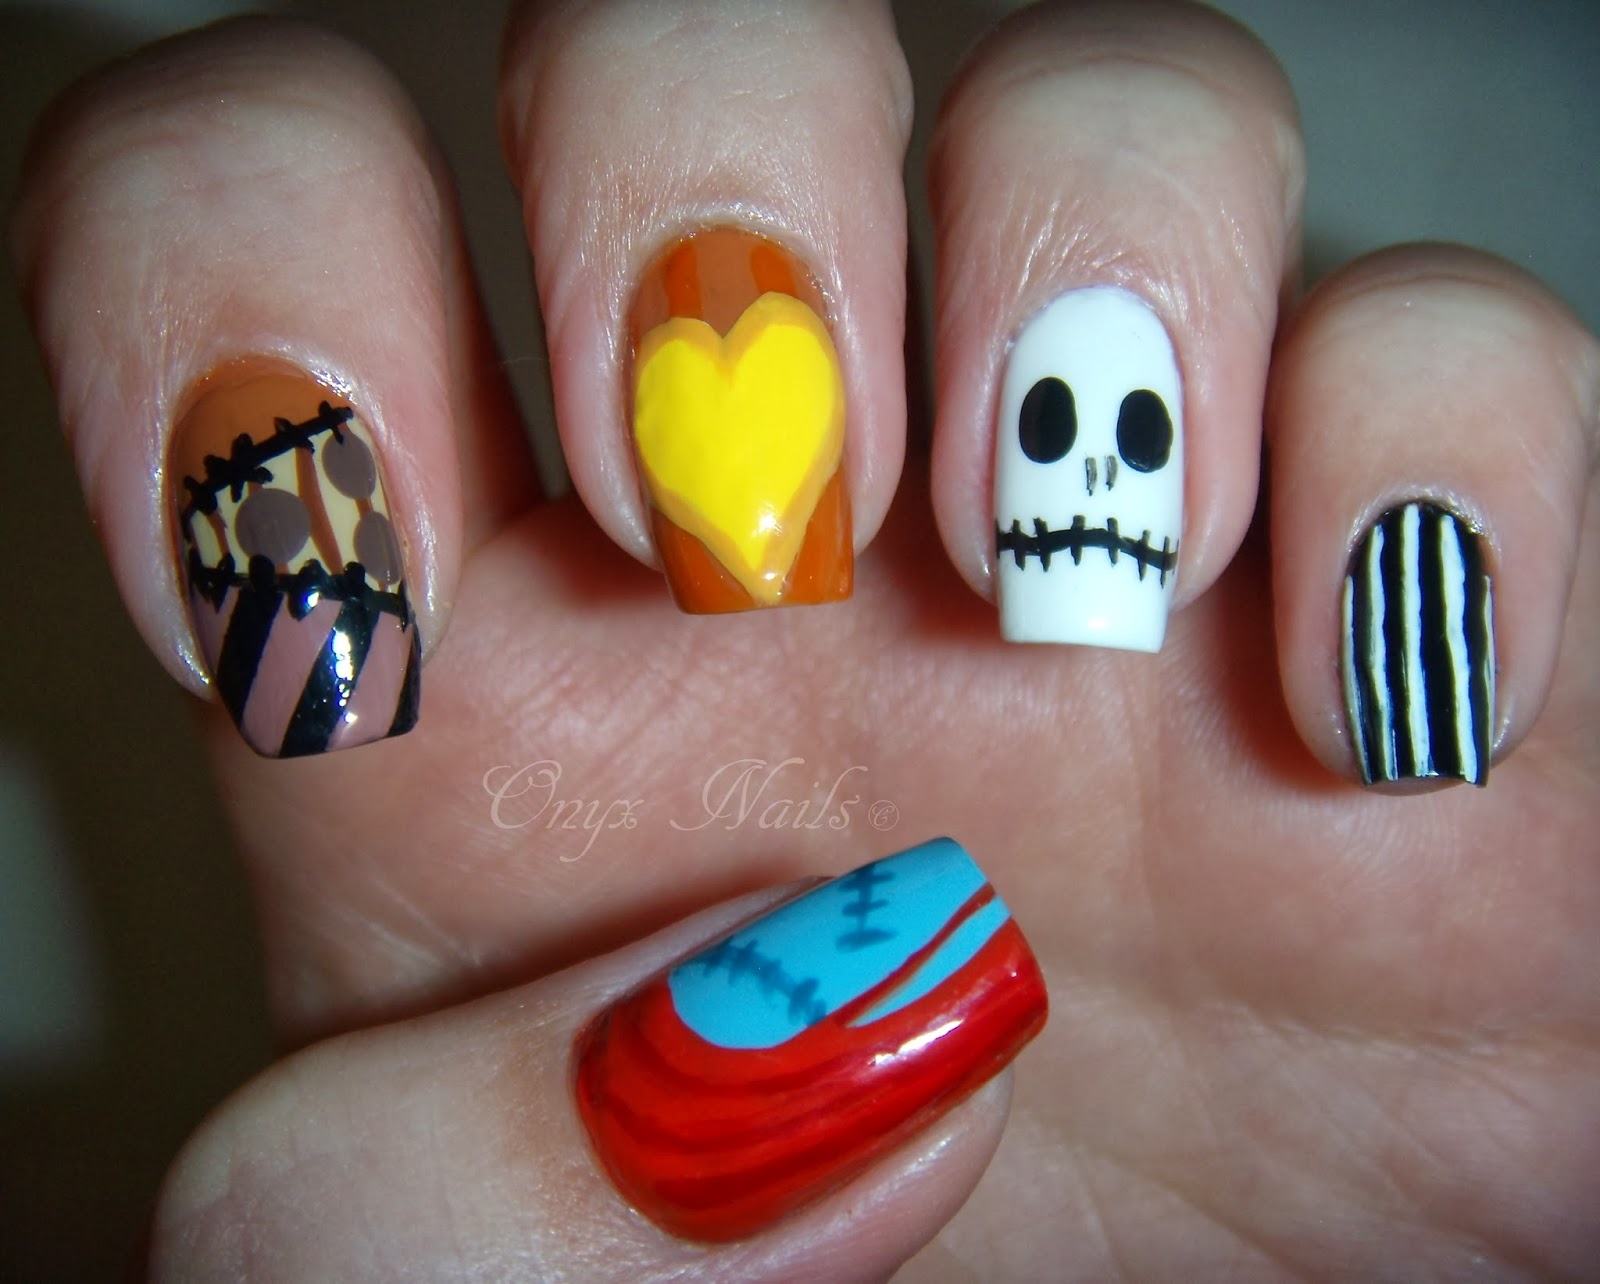
So today I have a Nightmare Before Christmas manicure for you guys. I'm calling this one 'We're Simply Meant To Be." With an underlying theme of the love Jack and Sally share (hence the title). It didn't turn out exactly as I wanted it to...So we are just going to call it stylized Jack and Sally...In fact if you like it you have my friend Marcie to thank for it (I was going to scrap it until she said she loved it). Conversely if you hate it she's also the one to blame (sorry Marcie). Anyway here it is:
Pictures:
Indoor no flash.
*The middle finger is supposed to be a pumpkin with a heart carved in it.
Indoor with flash.
Closeups:
Sally's dress inspired nail.
Jack's Face.
Sally's long red hair and stitches.
What I Used:
China Glaze - Desert Sun
China Glaze - Happy Go Lucky
China Glaze - Dress Me Up
China Glaze - Bahamian Escape
China Glaze - Shower Together
China Glaze - Street Chic
China Glaze - Salsa
China Glaze - Roguish Red
China Glaze - Kalahari Kiss
China Glaze - White On White
China Glaze - Liquid Leather
Nail Art - Cocoa
Nail Star - Medium Orange
Konad - Black
Americana - White Wash
Ceramcoat - Black
Stamping Plate (for stripes on Sally's dress nail) - Essence - Have Fun 01
The song from the film:
We're Simply Meant To Be
Usually, this would be the part where I tell you haw I did it...but this one is pretty complicated and I'm not entirely happy with it so I'm just going to throw this up here and say "Here, I did a thing." If you like it I'm glad, if you hate it...well I'm not happy with it either. But anyway I hope you guys all have a safe and happy Halloween and eat lots of candy, watch lots of horror films and and carve lots of pumpkins. That's all I have for you guys today. Until next time, stay classy, and stay polished.
XOXO
Today, I have the traditional end of the month stash additions post. Here are the nail polishes that I added to my collection this month.
Sally Beauty Supply:
China Glaze - Fang-Tastic and Bump In The Night and Gelous base coat.
Target:
Two bottles of Nicole Drying Drops not how cheap they were on clearance.
T.J. Max:
China Glaze - Admire & Hey Doll and Orly Fantasea & High On Hope.
Dollish Polish:
Spectral Pup (mini)
A Congratulations on the New Job Gift From My Friend Marcie:
Popular, Defying Gravity, & One Short Day
So as you can see I was pretty good this month. I did go crazy but I got some good deals at T.J. Max and at Target. and I couldn't let a chance to get Spectral Pup pass me by I had to have it. I have also ordered a few more Dollish Polish polishes but they haven't come yet (so they will be in next months Stash Additions post). Have you guys added any pretty new polishes to your collection lately? What did you get? Well that's all I have for you today. Until next time, stay classy, and stay polished.
XOXO
First if all I wanted to apologize for being MIA lately. I just started a new job and haven't quite figures out a good pacing yet (I promise I will work on it though). Plus, I got a case a food poisoning (from a local TexMex place that I will never eat at again...it's funny how 3AM puke fests will do that to you). But luckily it is no longer making me toss my cookies but I am still a little light headed. That said I wasn't going to let it keep me from getting this post up. Luckily I did the mani on Sunday and edited the pics before the food poisoning kicked in. So I can handle the write up today (light headed or not). Anyway, today I have a Halloween water marble to show you guys. Actually it didn't exactly turn out as I wanted it to...But I like it and it's Halloween-ish so I'm posting it anyway. So without further ado here it is:
Pictures:
Indoor no flash.
Indoor no flash.
Indoor with flash.
What I Used:
China Glaze - Sun Worshiper
China Glaze - Near Dark
China Glaze - Desert Sun
Dollish Polish - This Is Halloween
I started with a base coat of Sun Worshiper then water marbled with Near Dark and Desert Sun. Once it was dry I added a layer of This Is Halloween to my ring finger as an accent nail. So what do you guys think? Do you like it? I really Do like it...even if it didn't turn out just as I wanted it to be or how I Imagined it would be. Anyway that's all I have for you today. Until next time, stay classy, and stay polished.
XOXO
Today, I have another Halloween manicure to show you guys. To be more specific I have a Gravestone manicure to show you. Pretty basic but one I haven't done yet so here it is:
Pictures:
Indoor no flash.
Indoor no flash.
Indoor with flash.
Indoor with flash.
What I Used:
Zoya - Storm
China Glaze - Concrete Catwalk
China Glaze - Recycle
China Glaze - Matte Magic
Essie - Cashmere Bathrobe
Deborah Lippmann - Defying Gravity
Ceramcoat - Black
For this mani I started with Storm and then free handed the darker edge of the tombstones with Concrete Catwalk then went over top of that to make the face of the tombstone with Recycle. When that was dry I sponged on Cashmere Bathrobe and then decorated the face of the tomb stone with Black acrylic paint. I then used a matte topcoat so it looked like stone. And finished up with Defying Gravity as grass growing around the stone. Over all I rather like how this manicure turned out. What do you guys think? Anyway that's all I have for you today. Until next time, stay classy, and stay polished.
XOXO
So today, I was feeling all nostalgic for Halloween when I was a kid and decided to do a nail art based on one of my favorite Halloween cartoons growing up. The cartoon is way older than me, but my mother pretty much recorded every holiday cartoon every drawn and I got to watch them all growing up (on gasp...VHS). I still have a VHS copy of it actually and I even still have a VCR to play it in (Gasp). Anyway, Witches Night Out is one of my favorite retro Halloween cartoons so I decided to do a manicure based on it. So without any further ado, here it is:
Pictures:
Indoor no flash.
Indoor no flash.
Indoor with flash.
Indoor with flash.
Closeups:
Thumb - Nicely
Index Finger - Small
Middle Finger - Bazooey
Ring Finger - Tender
Pinkie Finger - The Witches Magic Wand.
The center glows in the dark...but my camera wasn't having it.
What I Used:
China Glaze - White On white
China Glaze - Sea Spray
China Glaze - Ghoulish Glow
Konad - White
Dollish Polish - This Is Halloween
Americana - Mustard Seed
Americana - True Red
Americana - White Wash
Ceramcoat - Black
Stamping:
Cheeky CH48
Movie Cover Art:
YouTube has the whole video so go watch it already.
To get this look I used a base coat of Seas Spray and topped it with This Is Halloween. I then made my own decals from my own drawings for Small, Tender, Nicely, and Bazooey. I made a stamping decal for the magic wand and then applied them all and top coated them. I mixed the acrylic paints to get the desired colors for Small and Nicely because I didn't have the right colors to start with. On the decals I opted for pencil as opposed to pen or marker because I thought it would fit the style of the cartoon better. So all my followers who are fans of vintage cartoons, how did I do? I rather like how they turned out. I hope you guys enjoy this manicure as much as I do. That's all I have for you today. Until next time, stay classy, and stay polished.
XOXO
Today, I have another Halloween manicure to show you guys. I'm calling this one Graveyard at Dusk. I used sponging, stamping, self made decals (Thumb), and loose glitter. I really hope you guys like this one. I'm really digging it.
Pictures:
Indoor no flash.
Indoor with flash.
Thumb Closeup:
Indoor no flash.
What I Used:
China Glaze - Scandalous Shenanigans
China Glaze - Infra Red
China Glaze - Not In This Galaxy
China Glaze - Happy Go Lucky
Konad - Black
Ceramcoat - Black
Silver holographic stars and crescent moons
Stamping:
HD04
To get this look I used a base coat of Not In This Galaxy then sponged on the gradient or Scandalous Shenanigans, Infra Red and Not In This Galaxy. Then stamped on the graves, applied the decal for the thumb, and finally added the loose glitter. Over all I really like how this one turned out. It actually kind of reminds me of the Adams Family...probably because of the big Gothic house next to a grave yard. But I figured every graveyard has a keepers cottage. This one is just a little more grand and Gothic than most. Anyway, I hope you guys enjoy this manicure. That's all I have for you today. So until next time, stay classy, and stay polished.
XOXO
Today, I have a Halloween nail art to show you guys. It's a two hand manicure (I did both hands in different designs) that is based on the horror film The Cabin In The Woods. Which I must say is pretty high on my horror movies I like list. I'm not going to tell you too much about the movie because...well to be honest I don't know what I can say that won't give it away or hint at the ending. Yes it's that good. I mean come on it's co-written by Joss Whedon (and if you don't know why Joss Whedon is awesome then I don't think we can be friends). Anyway here's my The Cabin In The Woods Manicure.
The Trailer:
And if you are a Chris Hemsworth fan (I am not) clearly he's also in it...but you should watch it because hello, Joss.
Left Hand (Matte):
Indoor no flash.
Indoor with flash
Left Hand (Glossy):
Indoor no flash.
Closeups:
All indoor no flash. And yes I do realize how much junk The Whore has in her trunk...and how big her boobs turned out....I really can't explain how it happened I just went with it. #SorryNotSorry
Right Hand:
Indoor no flash.
Designs left to right: Pinkie - Buckner Zombie Hand, Ring - Hadley's Shirt & Tie, Middle - Torture Orb, Index - Deadly Unicorn, and Thumb - Giant Man Eating Cobra.
Indoor with flash.
What I Used:
Left Hand:
China Glaze - Kalahari Kiss
China Glaze - Lemon Fizz
China Glaze - Desert Sun
China Glaze - Foie Gras
China Glaze - Matte Magic (For Matte)
Right Hand:
China Glaze - White On White
China Glaze - Liquid Leather
China Glaze - Near Dark
China Glaze - Immortal
China Glaze - Westside Warrior
China Glaze - Salsa
China Glaze - Gossip of Gimlets
China Glaze - Kalahari Kiss
Nail Art - Black
OPI - Don't Pretzel My Buttons
Konad - White
Essie - Cashmere Bathrobe
Stamping Plates:
Cheeky - CH5 (Design for torture puzzle orb)
HD04 (Zombie Hand)
Mash - M39 (Unicorn)
Fauxnad - M28 (Cobra)
As you can see I used a ton of nail polish for this...and no acrylic paint (that's a first). I started with my left hand painting two coats of Kalahari Kiss then sponging the other listed colors over top, darkest to lightest with a topper or Kalahari Kiss. Then when it was dry I topcoated it and painted the stone drawings on by hand using Foie Gras. For the right hand I painted the pinkie with Liquid Leather, ring finger with White On White, and the remaining fingers with Immortal. I made stamping decals for the snake and the zombie hand. A regular old self made decal for the torture puzzle orb and free handed the Hadley's shirt with black tie. For the right hand I just chose a bunch of images from the film that I rather liked. It was a lot of work. But I really like how it turned out.
I just wish the art on my left hand was as awesome as the preliminary drawings I did. Seriously someone needs to invent a nail polish pen or pencil that works like a real pen or pencil but for your nails and then I will be able to make some wicked nail art. I'm sure not having carpel tunnel would help to though. Anyway, I hope you guys enjoy this Halloween nail art and if you haven't seen the movie I highly recommend it. It's worth it for Hadley's awkward white boy dance alone. Until next time stay classy and stay polished.
XOXO
Happy Halloween Everyone! I hope you are all having a safe and fun holiday. Today I have one last Halloween Manicure for this year. This manicure is inspired by the movie Trick 'r Treatstarring Anna Paquin. If you haven't seen it you should it's pretty awesome. Here's the trailer.
And here's the manicure (warning this is a 2 handed manicure and a picture heavy post):
Left hand:
Indoor with flash.
Indoor no flash.
Outdoor in shade.
Outdoor in sunlight.
Close ups:
First and middle fingers. Movie logo.
Pinky finger. Pumpkin sucker.
Ring finger. Red Riding hood/Laurie.
Thumb. Sam/Peeping Tommy.
Right hand:
In the movie carved pumpkins are very important.
Indoor with flash.
Indoor no flash.
Outdoor in shade.
Outdoor in sunlight.
What I used (on my left hand):
China Glaze - Immortal
Sally Girl - White
Sally Girl - Black (Poser maybe)
Americana - White Wash
Americana - Mustard Seed
Americana - True Red
Americana - Spanish Olive
Ceramcoat - Charcoal
Ceramcoat - Black
Nail Star - Neon Yellow
Nail Star - Dark Orange
Nail Art - Red
Nail Art - Cocoa
Sharpie Pen - Black
What I used ( on my right hand):
China Glaze - Immortal
Sally Girl - White
Sally Girl - Black (Poser maybe)
Americana - Mustard Seed
Americana - True Red
Americana - Spanish Olive
Nail Star - Dark Orange
Nail Art - Cocoa
Sharpie Pen - Black
Well there you have it, my last Halloween manicure of 2012. I am in love with how my thumb turned out. And pretty impressed with the background on the nails too, a sponging gradient that fits the foggy night in the film perfectly. Anyway, I hope you enjoy this manicure as much as I do, and also I hope you have a fun and safe Halloween. Until Next time, stay classy and stay polished.
XOXO
Today, I have another Halloween manicure for you guys. I have my Halloween Is Witch Night manicure to share and I hope you enjoy it.
Pictures:
Indoor with flash.
Indoor no flash.
Outdoor in shade.
Outdoor in sunlight.
Products I used:
China Glaze - Gaga For green
China Glaze - Flying Dragon
Sally Girl - Black (Poser maybe?)
Konad - White
China Glaze - Matte Magic
Shany Plate SH02
And a song from my favorite witch movie The Craft. Letters To Cleo - Dangerous Type. Enjoy
Well there you have it. Yet another Halloween manicure. What can I say I love Halloween it's my favorite time of year to do nail art...plus you know the candy doesn't hurt either. What do you guys think? Do you like my witchy mani? Tomorrow I will be back with one last Halloween Manicure then on to fall/Thanksgiving mani's and more swatches. Anyway that's all I have for you today. Until next time, stay classy and stay polished.
XOXO