Thursday, August 30, 2012

OPI Germany Collection Danke-Shiny Red Swatch and Review

     So here's another swatch from OPI's Germany Collection. This time it's Danke-Shiny Red. This polish is a metallic red polish that actually (and weirdly) reminds me of the ribbon candy my mom...errr I mean Santa Claus used to put in my stocking for Christmas. Look over HERE to see what I'm talking about. Which makes me wonder why they didn't make this polish part of the Christmas line but hey what do I know I'm just a silly girl. But I'm getting sidetracked. This polish is bright red with really pretty shimmer and gloss to it.

The bottle.

Inside with flash.

Inside without flash.

Outside in the shade.

 Outside in direct sunlight.

     For all these pictures I used two coats of polish and a top coat. This round of photo's I think the 'inside with a flash' picture is the best color representation, compared to how I see it on my nails as I'm typing this. It applies really easily and dries quickly. I can see this polish ending up in a lot of nail art come December. Definitely worth the cost. Until next time stay classy and stay polished.
XOXO


Tuesday, August 28, 2012

OPI Germany Collection Don't Pretzel My Buttons Swatches

      So my wonderful friend Marcie (see her over in my minion section ----->) got me a nail polish because she's awesome. She got me OPI Don't Pretzel My Buttons from the Germany Collection. And it's just as pretty as I knew it would be. It's a pale peach creme that oddly enough when photographed under certain lights looks like a pale tan. Marcie and I decided it was nail polish with craft. But it's pretty witch craft. Here's the nail porn....errr I mean the swatchy goodness.

The bottle. 

Indoor with flash.

Indoor without a flash.

Outdoor direct light.

Outdoor in the shade.

      As you can see the indoor without a flash shows how it can kind of show up a yellowish tan in photos. But looking at it on my nails right now it's a much better color representation in the outdoor direct light picture. All pictures are with two coats of Don't Pretzel My Buttons and a top coat. It applies really easily and is thick enough to only need two coats of polish but thin enough that is applies easily. I am absolutely in love with this polish and I can see it becoming one of my favorite nude polishes. What do you guys think? I think I'm in love. Until next time stay classy and stay polished.
XOXO


Sunday, August 26, 2012

I Love Clearance Nail Polish! Mini 'Great Deal' Haul!

     Okay, so I had to make a few stops yesterday and I always check the nail polish sections when I'm in a store. I can't help it, I'm a nail polish addict don't judge me. Anyway, I always check just in case something awesome is for a really good price and this week it really paid off. I had to get some nail polish remover and some base coat in Sally Beauty Supply and they were having a 50% off red tag clearance sale. I kind of wished that I would have gone in sooner because my local Sally was pretty picked over...but they still had at least one polish that caught my eye. So I picked up an Orly polish I have been wanting for quite a while. I picked up Decades of Dysfunction for $1.35 (originally $6.99). Who did a happy dance in Sally's? That'd be me. I had wanted to get this polish for quite sometime and the price was to good to pass up.

Here's what I got at Sally's.
  
   I also got a 32oz acetone nail polish remover that just looked to gigantic in the picture so I left it out. Now normally I don't buy pure acetone polish remover but I needed it to remove my gel polish and it's a god send to remove glitter polish, and clean up my nail art brushes. I also got a bottle of Bonder because I was almost out. Also on a side note if you are serious about nail polish/nail art get a Sally Beauty card it saved me a dollar each off both the Bonder and the nail polish remover. It's a great way to save a couple bucks every time you go in to Sally's. 

     Next I stopped into Fred Meyers and checked the clearance isle and scored some pretty amazing deals. I picked up two items at amazing prices. Here's what I got.


     I really enjoyed the other Gel Perfect product I have...well I do now after I learned how to use it properly. Anyway when you buy a Gel Perfect product you get a coupon in the package for $2 off your next Gel Perfect product. I had it in my wallet when I went in and found that there were still Gel Perfect polishes on clearance and that the clearance was an additional 50% off the red price. So here's the break down on the awesome price for Gel perfect. It's original price was $12 but after the clearance mark down and additional 50% off it was only $4.78. Wait it get's better. Then I used my $2 coupon which made my Gel Perfect only $2.78 (that's a $9.22 savings!). How freaking cool is that? Also I got another coupon inside this box so I may have to go back again. I also picked up a Sally Hansen Salon Effects strips, for two reasons, first I have wanted to try them for a really long time (but the price makes me cringe), and two for the price I couldn't pass these strips (normally $9) up, because after clearance and additional 50% off I picked it up for $3.38. That makes my total at Fred Meyers a low $6.16 for $21 worth of products. I would consider that a steal.
     So over all on clearance polish (at both stores) I picked up $28 worth of polish for a low $7.51. The only thing I love more than great polish is getting it at a great price. And when I can get them both....well that's just perfection.

     On this little shopping trip I also made a stop by my local J.C. Penny Salon and picked up two of the new OPI Germany collection. These weren't clearance prices but they were on sale. Which is still pretty freaking sweet. I hate paying full price for nail polish it makes me sad...in fact come to think of it I have never paid full price for any of my nail polish I always get a sale, clearance, coupon or whatever to knock the prices down. Anyway I digress. The OPI polishes (normally $8-$10 depending on where you buy them) are on sale for $6 each if you buy two or more. So naturally I bought two. You know to save money. And since I have very few red polishes I picked up two of the red polishes in the Germany collection.

So for $12 I picked up Danke-Shiny Red and German-Icure. 

      I don't do a lot of these haul posts because honestly I don't buy polish all that often....well let me put that in perspective. I don't buy polish as often as it seems the nail bloggers I follow seem to buy polish. But I was wondering what you guys think of haul posts. Are they cool or are the too braggadocious? Let me know what you think. Also, would like to see some swatchy goodness of these colors? If so comment below with which one you would like to see swatched and I'll post a swatch for you. Until next time, stay classy and stay polished.
XOXO


Friday, August 24, 2012

Two More Favorites

     This post is really a two for one post since I can't show one polish without the other one underneath it. This was supposed to be my favorite flakie polish but you can't see flakie polish without a good black polish underneath it I am doing a favorite Flakie and favorite black nail polish post instead.

So here's the winner for my favorite black polish
China Glaze Liquid Leather

     Just about every company has a black polish and I have tried most of them. I just happen to love black nail polish it says I mean business, don't mess with me. Plus it's in such sharp contrast with my white as a ghost skin that it's very noticeable and full of contrast-y goodness. IMO. Here are some shots of my favorite black polish China Glaze Liquid Leather on my fingers.

Indoor with flash

Indoor without flash

     Now for the second part of this favorites list. Since my favorite color is blue I just fell in love with this flakie as it shines between dark blue, through teal, to green. By far the prettiest flakie that I have had the pleasure to come across. And now for the fun part my favorite flakie nail polish.

Finger Paints Motley

     As you can tell I love this polish. I have used it a lot and it's only about 3/4 of a bottle left, I'm going to have to use it less (insert sad noise here). It's well loved considering that it just came out last winter. Which means I may have to hunt down another bottle and pay and arm and a leg for it if I want to keep it around. But I digress here are some pictures of how pretty this polish is over a black base coat.

Indoor with flash.

Indoor without flash.

Outdoor in natural light.

So there you have it two more of my favorite polishes. Which flakie and black polish do you guys like? As always let me know what you think by leaving a comment below. Also if you have any requests feel free to ask and I'll see what I can do for you. Until next time, stay classy and stay polished.
XOXO


Tuesday, August 21, 2012

My Favorite Purple Nail Polish

      Since I am running out of ideas for tutorials I figured I would just do a series of posts on my favorites. I have several. Today I am going to show you guys my favorite purple nail polish. It's not a new polish and it's part of China Glaze's core line so if you like it, you should be able to run to your nearest BSS (Beauty Supply Store) and pick it up for around $5-$6(ish). I actually just found this polish myself not to long ago and fell in love with it. Normally I stick to blues and blacks because I just love them so very much but when I saw this one I knew it had to be mine. Added bonus it works with my skin tone really well. Any way without further ado here is my favorite purple nail polish. (Drum roll please)...

Below Deck

    Below Deck is a pale purple creme that has kind of a taupe undertone to it in some lighting. I know it's not as dark as some really pretty purple polishes but it's by far and away my favorite purple for my skin tone and you can get away with wearing this shade of purple year round. The darker purples say winter to me and the brighter purples say summer. This polish says wear me any time your little heart desires. And my heart definitely desires to wear it, and often. It's kind of a sassy yet understated polish. Here's some shots of it on my nails in different lighting.

Inside with a flash.

Inside without a flash

In natural light. 

And because I have this song stuck in my head I'm posting it here. Plus Porcelain doesn't get enough play and the song is as sassy and fun as the polish I love. Enjoy. 


     What do you guys think? Do you like this color as much as I do? Also I still need some ideas on what to do future tutorials on. Help a girl out over here. Leave me a comment below and let me know if there is anything you want to see. Until next time stay polished and stay classy.
XOXO

Friday, August 17, 2012

Superman Nails Tutorial

     Okay, so I have been wanting to do this manicure for a while now but I got a cold and the last few days I have not felt like doing much of anything much-less painting my nails. But now I'm feeling better and decided to try it. So I guess I have to outright admit I am a nail polishaholic because when I went to see Dark Knight Rises on opening weekend I saw the trailer for Man of Steel (The new Superman movie out next year) and saw the Superman symbol and thought, "That would make the prettiest polish." To which my husband rolled his eyes and offered me some popcorn.

Here's the symbol.

And a link to the trailer in case you haven't seen it and want to.

     Yeah...so I have a problem but like I tell my husband "It's cheaper than shoes so deal with it." But anyway I went straight home and started playing with my polish and came up with this manicure, which I think is fairly close...well at least I think so. And I think it's really pretty even if it's not exactly like the Superman symbol. I would think you could also get this look if you had OPI Spotted polish (that's only available over seas)...but I have heard some bad things about what's in the Spotted polish that makes me hesitate to obtain a bottle...plus you can get a pretty similar effect with plastic wrap so that's what I used. Shall we get to it? I thought you might say that. Let's go.

Here's what you will need.
A base coat (Orly Bonder) and a top coat (Diamond Dry).

A black polish (China Glaze Liquid Leather), a gold polish (China Glaze Passion) and thin red polish (China Glaze Salsa). As well as tweezers to hold the plastic wrap away from your nails.

A bunch of 2in x2in (ish) pieces of plastic wrap. The more bunched up they are the better

Somewhere to drop some polish. A blank piece of paper or paper towel is a good idea as well. Please forgive the marble, I had to place something on the tray to get my craptacular camera to focus on it.

Start with clean, dry nails.

Add a base coat.

Apply first coat of polish. Select the gold polish.
Allow to dry.

Apply second coat of polish. This coat should be a thin coat of the red polish. 
Allow to dry completely.

Place a few (3-5) drops of polish on a plastic surface.

Take balled up plastic wrap in the tweezers.

Dip plastic wrap in the polish.

Pat on paper until you have just a little on the plastic 

Apply to entire nail (in the same way you would apply sponged on nail polish) and you should have something that looks like this.

Then clean up the cuticles.

Add a top coat (don't forget the free edge).

And here's a shot in daylight (The weather cooperated with me today. It does happen who knew).

     And there you have it. I know it's not exactly like the Superman symbol but it's close enough that I am happy with it. Well that's all I've got for you today. I hope you enjoyed this tutorial and if you have any questions as always feel free to ask in the comments below. Until next time stay classy and stay polished.
XOXO
      

Friday, August 10, 2012

Stormy Seas Manicure Tutorial

     I was bored on the internet and found a really pretty picture of the ocean and thought "That would make really pretty nail art." So I Google searched ocean manicures and didn't like anything I found so I decided to make my own. Want to see it? Of course you do. Don't worry I'll show you in a minute. Want to be able to recreate it? I thought that you might.

Here's what you will need.
Base coat Orly Bonder and top coat Diamond Dry

A white polish (Sally Hansen - White On), a soft grey polish (OPI - Skull & Glossbones), a soft shimmer blue polish (China Glaze - Sea Spary), a medium blue shimmery polish (OPI - I Don't Give A Rotterdam!), and a medium blue polish (China Glaze - Man Hunt).

Tweezers, a bunch of tiny sponge pieces, and  something to drop polish onto (I'm using a Crystal Light lid).

A stamping nail art stamper and scraper. As well as some aquatic themed stamping plates. I'm using Mash M52, Mash M27, and Shany SH19.

Polishes to use for stamping. Medium pink creme (China Glaze - Fifth Avenue), pale yellow creme (China Glaze - Lemon Fizz), neon sparkly yellow (China Glaze - Solar Power), metallic silver (China Glaze - Icicle), metallic gold (China Glaze - Passion), and white stamping polish (Konad - White).

And because this manicure is going to take quite a while I suggest a really good play list to pass the time. Here's mine.
There should be something here for everyone...unless you only like country music in which case you and I are never going to agree on music...ever. But you don't have to listen to what I'm listening to. Feel free to pick you own list. I'll never know. 

Start with clean dry nails, that are filed, and have the cuticles pushed back

Then apply a base coat

Then polish with the medium blue polish (China Glaze - Man Hunt)

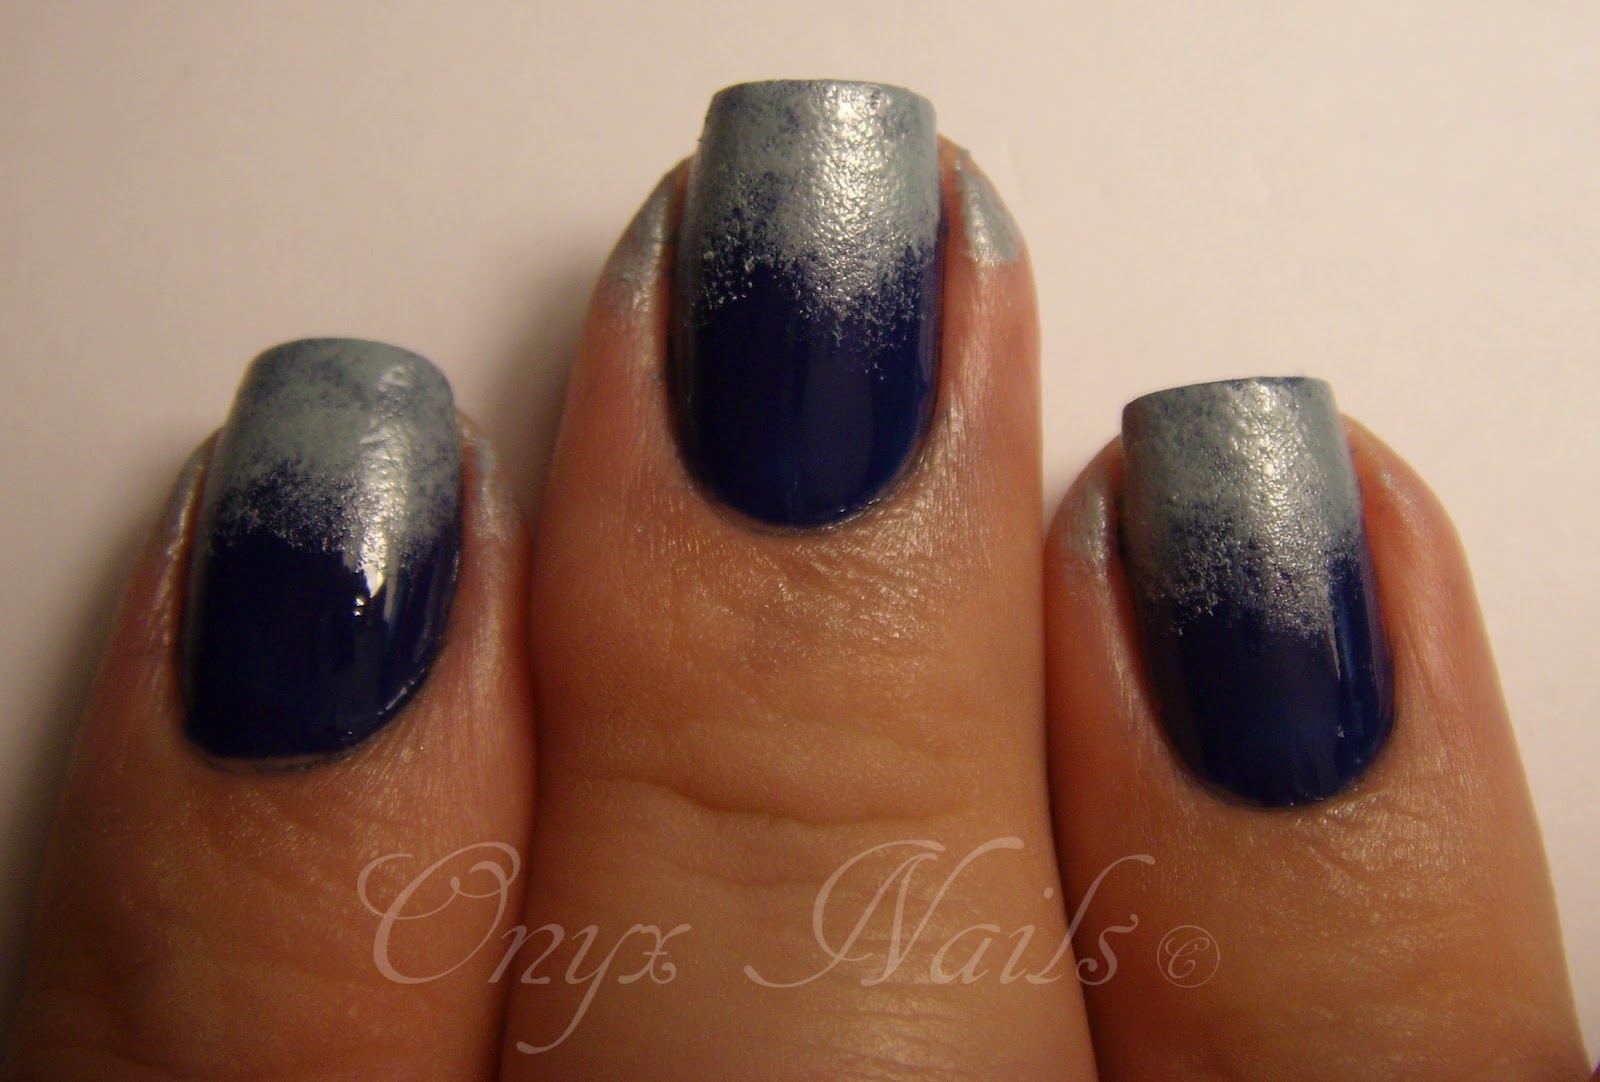
Place a drop (or two) of the pale blue shimmer polish (China Glaze - Sea Spray) on desired surface and use tweezers to hold the sponge and dip it into the polish. 

Apply to nail. Go about 1/2 way down the nail.
Allow plenty of time to dry.

Apply light grey (OPI - Skull & Glossbones) polish in same fashion to only the upper portion (top 1/4) of the nail.
Let it dry.

Apply white (Sally Hansen - White On) polish to tip of nail only. 
Allow to dry fully.

Apply medium blue sparkly (OPI - I Don't Give A Rotterdam!) polish over top 1/2 of nail, to add sparkle and blend the colors. 
Some more dry time. And that's why you need a good play list. I kick my feet up and listen some to some tunes while I wait for mine to dry.

Clean up the cuticles

Add a top coat.
Feel free to stop here if you like or go on and give your oceans little fishy friends. I'm not going to show the stamping process as it's pretty straight forward. If you would like to see it leave me a comment and let me know and the next tutorial will be stamping nail art.

After stamping and a top coat you will have something like this.

Indoor with flash

Indoor without flash

I tried to get a picture in the sunlight but the sky isn't cooperating with me and looks like this...

So here's the best I can do, a picture in natural light....

     And there you have it a Stormy Sea manicure with a few fishy friends. What do you guys think? I really liked how this one came out. Specially because it's an original design...okay maybe more so because it's an original design. Let's be honest it's always nice to try something and have it look this awesome rather than try something and have it look terrible. Any way I hope you enjoyed this tutorial and please, please leave me a comment telling me what type of tutorial you would like to see next I'm running out of ideas. Until next time stay classy and stay polished.
XOXO