So, first off before I get to the manicure I wanted to let you guys know why I've been MIA the last week or so. It's really a super fun collection of "super fun" (Sarcasm alert) events. My car broke down, then the keyboard in my laptop quit working (then randomly started working again the next day), and I broke my baby toe or my left foot (don't ask how it's kind of an embarrassing story, who am I kidding when is it ever a non-embracing story when I hurt my clumsy ass). Plus, a couple of good things also distracted me: I read four books I couldn't put down, and got a new
Sims 3 expansion pack...so yeah all these things have converged to distract me. But anyway, I am back and I have some nail art to show you guys. Do you remember the
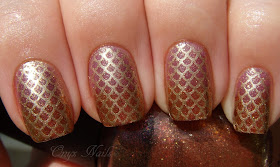
Mermaid Manicure Tutorial I posted back in January? Well after getting my new Sims 3 Expansion (Island Paradise) and playing with the new mermaids I wanted to do a new mermaid manicure. But this one is a different version of the Mermaid manicure. Or at least a different color scheme at any rate. I am calling this one
Sunset Mermaid. Enjoy.
Pictures:
Indoor no flash.
Indoor with flash.
Outdoor in sunlight.
Outdoor in shade.
What I Used:
ORLY - Ingenue
OPI - Sprung
China Glaze - Passion
Shany Stamping Plate - SH222
I used sponging to get the base gradient and then stamped over top of it. Over all I really like this look. It reminds me of tropical sunsets and mermaids of course. Anyway, I hope you guys enjoy this manicure as much as I do. Until next time, stay classy and stay polished.
XOXO


No comments:
Post a Comment