I had a request for a blog post
about basic nail art/nail polish terminology/lingo so I figured that since my blog is just starting up that now was a good time for this post and it would make a great
topic for this week's post. This is
going to be a picture heavy long wordy post. But
stay with me and you will learn a lot (hopefully) and have some fun doing it.
Orange
Stick: An Orange Stick is a wooden Stick that is beveled to a point on
one end and beveled to a slant on the other. These can be used for nail art (like
in water Marbling), or to push back your cuticles.

Free
Edge (of the nail): This is the very end of your nail. The tip that you
would use to scratch.

Dotting
Tool: A dotting tool is an instrument that has either a small point, or
a ball (in varying sizes), that is used in nail art to make dots, or draw
lines.

Striping
Tape: This is a small roll of tape that comes in many colors. It is
usually very thin and is used in nail designs as part of the design itself or a
tool to obtain the desired look.

3-free:
It would be great if this stood for 3 free nail polishes...but what it really
stands for is when a nail polish is free of Dibutyl Phthalate (DBP), Formaldehyde
and Toluene (known as the 'Big 3'). So I'm sure you're like me
and wondering "Why are these things bad?" Well here's what I have been
able to figure out thus far. In studies, long term exposure to these chemicals
can cause irritation. I personally select nail polishes that are 3-free because
I have uber sensitive skin...well that and eww it's Formaldehyde (as in what
they use to preserve dead bodies) I don't want that on my nail. Icky!
Tape
Off Your Nails: This is when you use some form of tape (Scotch or
painters tape) to tape around the nail for easier clean up when doing nail art
(Usually for messier nail art like water marbles, gradient manicures, splatter or any
sponging nail art). basically you are using tape to make your finger look like it's wearing a tiny little nun's habit.

(In case you were wondering that's Color Club: Factory Girl under Revlon: Whimsical on my nail)
Taping
Manicure: This is when you use tape (Scotch, stiping or painters tape) to get a
crisp line when painting your nails. Usually this is used in block manicures, French
tip manicures, and when you use craft hole punches or patterned scissors to create
a pattern on the nail. Or like below you want a random pattern to appear as if it's underneath the polish. I personally really like using striping tape to get the laticed look on the ring finger in the picture below.

Stamping
Manicure: A stamping manicure is when you use a stamper, and image
plate, and a scraper to put intricate patterns on your nails. A few of the most
popular brands are Konad, Mash, and Bundle Monster.

Gradient
Manicure: This is manicure in which the polish shifts color over the length
of the nail. This is usually done with a sponge and uses a layering of one
polish after another. The Ombre manicures and glitter gradients are all this
type of manicure.

Free
Hand Painted Manicure: This is a manicure in which all art on the nails
is painted by hand with nail polish, acrylic paint or some combination of the
two. This is among the harder forms of nail art and requires a steady hand and
lots of patience.

Water
Marble Manicure: This is one of the most difficult time consuming
manicures I have yet to try. It's a swirl pattern that's created using water
and nail polish to create a really pretty design on the nail. I will at some
point in the future put up a water marble tutorial when I have the patience for
it, because it requires a lot (and I do mean a lot) of patience. It's also the
type of manicure that a lot of people seem to have problems with. So since I am
able to do it, I feel somewhat responsible to put up a tutorial in the future,
to help others who are still struggling.

The "Right" Way To Paint Your Nails: First of all let me just say that there is no
right or wrong way to paint your nails. Anyone who claims there is a 'right' or
'wrong' way to paint your nails is probably a nail snob. It's really just
important to find a method that works best for you in terms of application.
There are a few good rules to follow though. Try to paint the nail in as few
strokes as possible (I can get all my nails in 2 or 3 strokes). Clean up any
polish around the nail on the cuticle as soon as possible. Go slow it's easier
to avoid mistakes when you go slow. Start with you pinkie and work toward your thumb so you are not reaching over wet nails to polish (it minimizes smudges). Wait for each coat to dry completely before
applying another coat (or you will get bubbles). Don't shake the bottle, invert it (tightly capped) and roll it between your palms. Base coats keep polish from
staining your nails. Top coats seal the
polish together and decrease chances of chipping. Lastly don't forget to paint
the free edge (with base coat at the beginning and top coat at the end) this
creates a better seal and decreases the frequency of chips.
How
To File Your Nails: Okay well here's how I file my nails. From right to
left (on my left hand) and from left to right (on my right hand). It doesn't
seem to matter which way you prefer but make sure you don't seesaw the file
across your nail, as this can increase the chance of the nail peeling. Also
it's important to note that you shouldn't file your nails when they are wet, because
your nails are not as strong. You could end up doing more harm than
good if you file them when they are wet. It's also important to note that it's
not a good idea to share nail files with anyone. I have heard some scary stories
of nail fungus spreading by sharing files. It's just good practice to have a file just for you and to avoid salons or people who want to use the same files on every one they work on (unless they are sanitized between each use and only glass files can be properly sanitized). Plus it's just better to have you
own personal file so you know where it's been.

Nail
Secrets: I get a lot of questions from people on how to get your nails
to grow. Here's what works for me and I hope it works for you. Most importantly
eat well, good nutrition goes a long way. I take a supplement as well. Any
supplement with Biotin in it or over the counter prenatal vitamins will help get
things growing (and help your hair grow fast and strong as well, it's win, win).
It's also important to keep your nails moisturized, it keeps them strong and decreases
the likelihood of painful and ugly hangnails. I am a lotion freak because of my
skin condition (Dyshidrotic Eczema) and I have also removed all hand soaps with
Triclosan from my home (as it's an allergen for me). Triclosan is used to kill
germs and funguses but is also very drying on your skin. I was also told by my
doctor that as long as you wash for the proper time (30 seconds) with Triclosan free (regular non-antibacterial) soap you will kill all the same germs as antibacterial soap so no hygiene
worries there. Also I lotion after every hand washing. I also use Solar (or
cuticle) oil right after I polish my nails. It's also important (at least for
me) to keep my nails polished. The bottom line is that to grow your nails you need to nourish
your nails (great nails start with a healthy diet), keep them moisturized
(lotion is your friend), and keep them polished. This is what has worked for me.
NAIL
POLISH FINISHES
Duo-Chrome
Finish: This finish is kind of hard to explain. Essentially a Duo-Chrome
polish is a polish that shines with two or more colors. Basically as you move
your finger the color you see changes depending on the angle and the light
situation. I don't currently have any true duo-chrome polishes (yet) so I won't
put a picture up but if you want to see a true Duo-Chrome polish do a Google
Image search for OPI - Just Spotted The Lizard, it's the best example I can
think of.
Holographic
finish: This is a high shine
finish that is kind of metallic and very eye catching. Think of the old school
holograms that came in cereals, and Cracker Jack boxes. It's the nail polish
equivalent of that. It's also got the same look to it as some of the hologram
seals I've seen on my husband's baseball cards. Expect to pay more for true
holographic polishes because of the higher cost of the holographic pigment in them.

Color Club: Worth The Risqué
Matte
Finish: A matte finish is just like a finish you would expect in any
matte makeup. When the polish dries it has a flat almost frosted glass look to
it. Almost all major brands have some form of matte polish. You can also buy Matte top coats that make any
nail polish matte.

China Glaze: Sun Worshiper
Flakie
Glitter: Flakie glitters are all the rage right now and they are a lot
of fun if you like a lot of sparkle. This type of polish has a torn flake like
appearance and is usually iridescent (changes color based on the color behind
it and the lighting). These polishes are usually best over another color. Use
light underneath a flakey polish for a more subtle sparkle. Use dark polish (or
black) to see a more dramatic color, or to show off more what the flakey has to
offer.

Finger Paints: Asylum
Jelly
Polish: A jelly polish is a polish that dries to a jelly finish. It also has a fairly transparent base color that when dried looks almost like a
jelly shoe (you remember those don't you?). Most of the Deborah Lippmann 'glitter'
polishes are in fact jelly polishes with glitter in them. Also a lot of colors that are marked as
"French Manicure" polishes are jelly polishes. A hint of color and a
shiny dried jelly like finish.

Deborah Lippmann: Lady Sings The
Blues
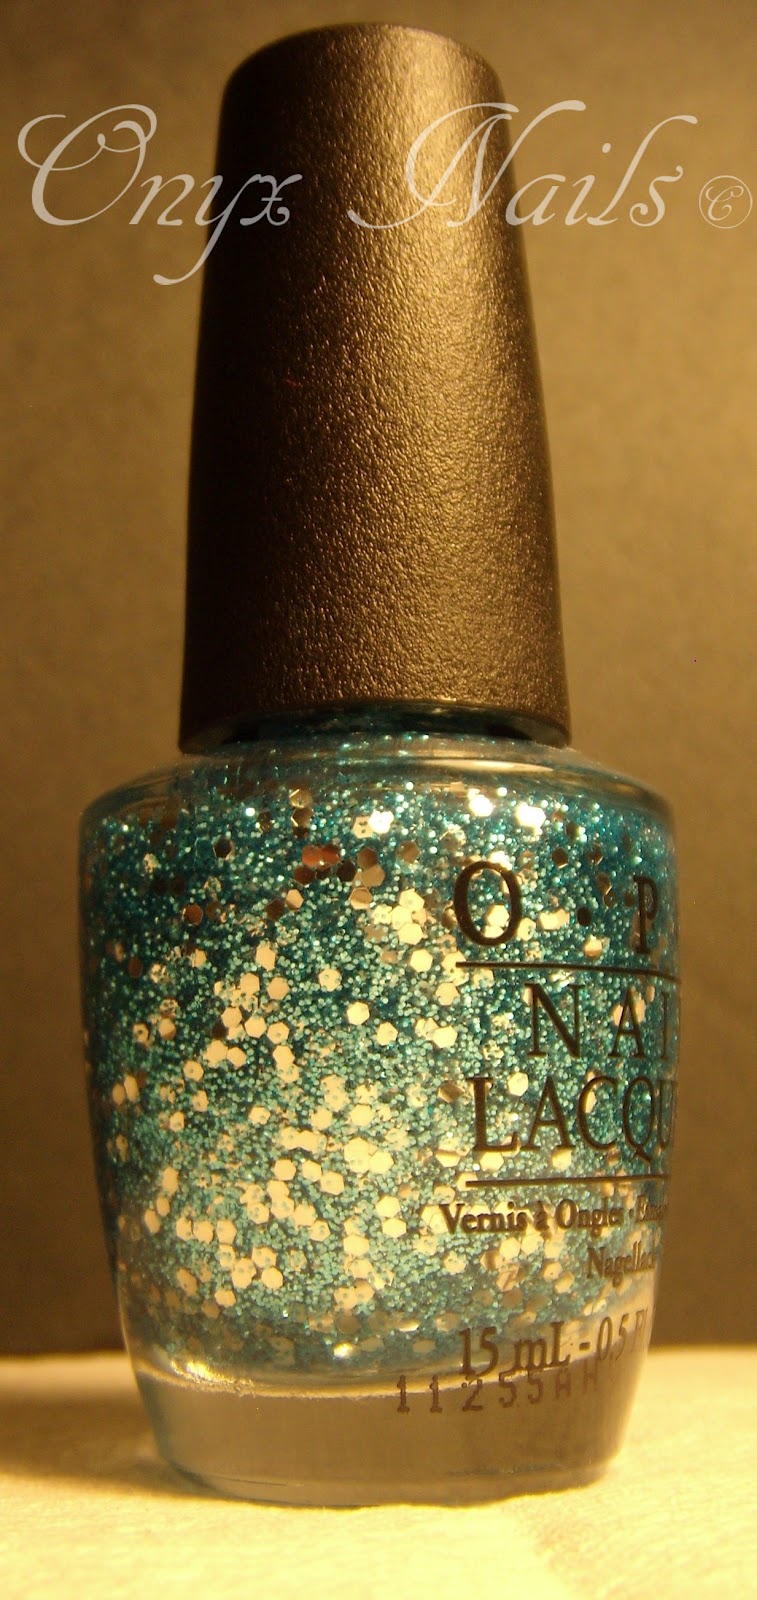
Glitter
Polish: Glitter polish is pretty self explanatory. It's a polish with
lots, and lots of glitter in them. They usually have a clear base and varying
sizes/colors/shapes of glitter suspended in them. Think nail bling...lots and lots of nail
bling.
OPI: Gone Gonzo
Crème
Finish Polish: This happens to be one of my favorite nail polish
finishes/formulas. These are polishes that have a creamy base to them. They
come in a wide variety of colors and kind of look like someone added milk to
the polish for a creamy color (hence the name). Every brand makes crème
polishes.

China Glaze: Below Deck
Indie
Polish: An Indie polish is a
nail polish that is made by a non-mainstream company. Usually 'mom and pop'
style venders who love nail polish and make great original polishes that
mainstream nail polish companies would never make. They are hand crafted, in
smaller batches by sellers who care about their products and take pride in
their work (and they should they are all insanely talented and make great
products). A good place to buy these is on the Etsy or Ninja Polish
websites.
Franken
Polish: A Franken polish is a
nail polish that is made by combining two (or more) nail polishes, glitters, or
pigments in order to create a new
original color of nail polish. I personally have made a few of these and it's
great fun. Especially when someone looks at your polish and says "Where
did you get it?" and you get to say "I made it." Plus it's a
great way to use up all those almost empty bottles you have lurking around. If
you don't have any yet give it time you will.

Onyx Polish (My Franken) : Nicole's Eyes
Nail
Striping Pen/Brush: This is a
nail art tool where nail polish is in a special container that has both a
skinny fine bristled brush and a pen like tip for dots. These make nail art
fast and easy. Almost every brand has some form of this whether it's a pure
striper or a pure nail art pen. I have Nail star because they were insanely
cheap on Ebay.

Nail Star: Black
I think I covered every thing...if
not and you still have questions leave me a comment and I'll add it to this
post or save it for the next nail terminology post. As always stay classy and
stay polished.
XOXO
XOXO


