I was bored on the internet and found a really pretty picture of the ocean and thought "That would make really pretty nail art." So I Google searched ocean manicures and didn't like anything I found so I decided to make my own. Want to see it? Of course you do. Don't worry I'll show you in a minute. Want to be able to recreate it? I thought that you might.
Here's what you will need.
Base coat Orly Bonder and top coat Diamond Dry
A white polish (Sally Hansen - White On), a soft grey polish (OPI - Skull & Glossbones), a soft shimmer blue polish (China Glaze - Sea Spary), a medium blue shimmery polish (OPI - I Don't Give A Rotterdam!), and a medium blue polish (China Glaze - Man Hunt).
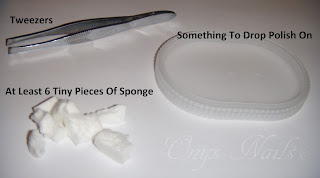
Tweezers, a bunch of tiny sponge pieces, and something to drop polish onto (I'm using a Crystal Light lid).
A stamping nail art stamper and scraper. As well as some aquatic themed stamping plates. I'm using Mash M52, Mash M27, and Shany SH19.
Polishes to use for stamping. Medium pink creme (China Glaze - Fifth Avenue), pale yellow creme (China Glaze - Lemon Fizz), neon sparkly yellow (China Glaze - Solar Power), metallic silver (China Glaze - Icicle), metallic gold (China Glaze - Passion), and white stamping polish (Konad - White).
And because this manicure is going to take quite a while I suggest a really good play list to pass the time. Here's mine.
There should be something here for everyone...unless you only like country music in which case you and I are never going to agree on music...ever. But you don't have to listen to what I'm listening to. Feel free to pick you own list. I'll never know.
Start with clean dry nails, that are filed, and have the cuticles pushed back
Then apply a base coat
Then polish with the medium blue polish (China Glaze - Man Hunt)
Place a drop (or two) of the pale blue shimmer polish (China Glaze - Sea Spray) on desired surface and use tweezers to hold the sponge and dip it into the polish.
Apply to nail. Go about 1/2 way down the nail.
Allow plenty of time to dry.
Apply light grey (OPI - Skull & Glossbones) polish in same fashion to only the upper portion (top 1/4) of the nail.
Let it dry.
Apply white (Sally Hansen - White On) polish to tip of nail only.
Allow to dry fully.
Apply medium blue sparkly (OPI - I Don't Give A Rotterdam!) polish over top 1/2 of nail, to add sparkle and blend the colors.
Some more dry time. And that's why you need a good play list. I kick my feet up and listen some to some tunes while I wait for mine to dry.
Clean up the cuticles
Add a top coat.
Feel free to stop here if you like or go on and give your oceans little fishy friends. I'm not going to show the stamping process as it's pretty straight forward. If you would like to see it leave me a comment and let me know and the next tutorial will be stamping nail art.
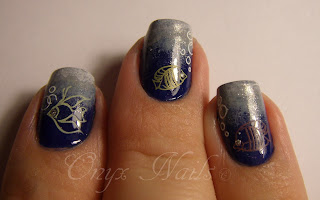
After stamping and a top coat you will have something like this.
Indoor with flash
Indoor without flash
I tried to get a picture in the sunlight but the sky isn't cooperating with me and looks like this...
So here's the best I can do, a picture in natural light....
And there you have it a Stormy Sea manicure with a few fishy friends. What do you guys think? I really liked how this one came out. Specially because it's an original design...okay maybe more so because it's an original design. Let's be honest it's always nice to try something and have it look this awesome rather than try something and have it look terrible. Any way I hope you enjoyed this tutorial and please, please leave me a comment telling me what type of tutorial you would like to see next I'm running out of ideas. Until next time stay classy and stay polished.
XOXO


